Sourdough Basics

Why I Make Sourdough
I’m not gonna lie, I first got hooked on sourdough because for some reason my phone flooded my social media feed with hundreds of videos of women making these beautiful sourdough loaves right in their very own kitchen. I was watching a solid hour worth of these videos each day, which was not great for my screen time, but they were oddly satisfying and calming in a way. Eventually, my roommate had enough of hearing random baking videos ringing through our house, so she went out and got me my own sourdough starter culture - which is still the best gift I’ve received to this day! Thanks Bea!
Receiving this sourdough starter culture nudged me to do some real research about sourdough and why it’s considered healthier than other breads. Here are three things that stuck out to me:
- Sourdough is a Probiotic
- Just like sauerkraut, kombucha, or kimchi, sourdough products are true probiotics because they contain live cultures of bacteria and yeast. In fact, the bacteria and yeast are what allow sourdough bread to rise and give it that distinct sour taste.
- During the fermentation process, the yeast living in the sourdough feed on the carbohydrates in the flour and produce carbon dioxide as a byproduct - resulting in rise and expansion. Similarly, the bacteria in the sourdough feed on the carbohydrates and produce lactic acid as a byproduct - resulting in that sour flavor many people love.
- Not only do the yeast and bacteria aid in the production of the sourdough bread, but they can also play a role in increasing the diversity and strength of your gut microbiome!
- Sourdough is Better on the Gut
- Sourdough products are not gluten or fructan free, but many people with digestive issues or gluten sensitivities can tolerate sourdough bread. This is because the slow-rising process allows time for bacteria to break down gluten and fructan - proteins and carbohydrates found in wheat that many people struggle to digest properly.
- Most people who cannot tolerate bread products believe they are sensitive to gluten, when really it might be the fructan causing the issue. Fructan is a carbohydrate found in wheat that is fermented by the gut microbiota, leading to gas production, bloating, and abdominal pain. The break-down of fructan during the fermentation process eases some of these symptoms and allows “wheat-intolerant” individuals to better tolerate sourdough.
- Conventional yeast products call for an extremely fast rising process, and essentially no time for bacteria to do any “pre-digesting” of gluten. Without this pre-digestion, gluten cannot be appropriately broken down by our human enzymes, and this actually activates a protein in the small intestine called zonulin. High levels of zonulin lead to increased gut permeability, which allows gluten molecules to seep into the bloodstream and trigger an autoimmune response.
- While sourdough bread still contains gluten and fructan, the 12-24 hour fermentation process allows bacteria to pre-digest these potentially harmful molecules which minimizes zonulin production, gut permeability, and gut inflammation, gas production, and other IBS symptoms.
- No Artificial Additives or Sugar
- If you go to the store and look at the label on a loaf of white bread, you will notice it has anywhere from 20-50 ingredients listed. Part of that ingredient list usually includes added sugars, dyes, and preservatives. This is especially concerning considering that bread only requires three ingredients: flour, water, and salt.
- I love to make my own sourdough products because I know exactly what’s going in the bowl. If I want to add sugar, I can - but I’m not subject to the harmful additives that come with practically every bread product on the shelf at the grocery store.
- If you want the benefits of sourdough but don’t want the hassle of making it, I would recommend buying it from a local bakery and making sure the ingredients are only flour, water and salt. Unfortunately most of the “sourdough” products at the grocery store are a scam, so make sure you’re reading the ingredient lists!
Yes, sourdough bread is a much better alternative to conventional breads found at the grocery store, but I’m not saying you should be eating a loaf a day. It is not the equivalent of eating fruits and vegetables, it is simply a better option if you love baked goods and want to incorporate them in your diet. I usually make one sourdough loaf per week and add a slice to my meals here and there (always with fiber and protein!). Occasionally I’ll experiment with other products that are fun to make. My top three so far are bagels, pizza dough, and cinnamon rolls.
On that note, my favorite part about making sourdough is not the nutritional benefits it offers, but how fun and rewarding it can be. There is definitely something to be said about the instant vs. delayed gratification pathway in the brain when it comes to baking your own bread from scratch. I’ve made a bunch of sourdough products at this point, but I still get so excited each time I take a loaf out of the oven because I get to see the cultivation of 24 hours of work. It’s also an amazing feeling to know that you just made a loaf of bread with your own two hands - a feeling we don’t get to experience much these days.
Now onto the real stuff. Here is a simple Sourdough Guide that I wrote for my mom and Margot, but also anyone else who wants to make their own sourdough from scratch!
Making the Starter
Making a strong starter from scratch is probably the most challenging step of the sourdough process and requires a lot of patience. Once a strong sourdough starter is established though, it becomes pretty easy to maintain. I used the Cultures for Health starter culture to make my sourdough starter, but if you don’t want to buy a culture, all you need is water and flour. Here is the daily schedule for making your own sourdough starter from scratch with just water and all-purpose flour:
Supplies
- Wide Mouth Glass Jar w/ Lid
- Food Scale
- All Purpose Flour
- Water
- Hair Tie or Rubber Band
Day 1:
*Before mixing the sourdough starter, weigh your glass jar in grams, write the weight on a piece of tape, and stick it to the jar. This will help you know exactly how much sourdough starter you have in your jar.
Combine 50g of flour and 50g of room temperature water in a glass jar - mix well
Cover loosely with a lid so that gas can escape
Leave on the counter for 24 hours
Day 2:
Discard (remove) 80% of the starter until you’re left with about 20g starter remaining in the jar
Add 50g of flour and 50g of room temperature water - mix well
Cover loosely and leave on the counter for 24 hours
Day 3-5:
Discard 80% of the starter (use the food scale to calculate)
Add fresh flour and water (50g of each) - mix well
Cover loosely and let rest on counter for 24 hours between each feeding
* You may start to see bubbles forming at this point, but don’t panic if not! It may take some starters up to 10 days to form bubbles which is totally normal.
*It’s also common for the starter to rise/get bubbly around day 3-4 then mellow out from there.
Day 6:
If your starter is active at this point (forming bubbles), begin feeding it twice a day
Use the same method of discarding 80% and adding 50g flour and 50g water
Feed once in the morning and once at night
Day 7-10:
By this point your starter may be ready to bake with!
Feed your starter using the same method as above, and once it has doubled in size (peaked), scoop a small amount out of the jar and place it in warm water.
If it floats, it’s ready to use!
If it does not float, continue with the twice daily feedings until your starter rises and bubbles more consistently with each feed. Reassess with the float rest.
Maintaining the Starter
After the sourdough starter is established, it still has to be fed daily or weekly depending on what temperature you keep it at. However, a strong sourdough starter is extremely resilient, so if you forget to feed it here and there it’s not the end of the world.
If you think you’ll bake everyday or every other day, it’s best to leave your sourdough starter at room temperature and feed it everyday. This method is nice because your sourdough starter is almost always ready to use, but you also have to be mindful of the frequent feeding schedule.
If you only want to bake 1-2 times a week, I would recommend keeping your sourdough starter in the fridge and taking it out when you’re ready to use it. The cold temperature slows down the rate at which the bacteria and yeast eat through the flour, so the time between feedings can be increased. If you’re not going to be baking for a while, store your sourdough starter in the fridge and feed it once a week.
Using the Starter out of the Fridge
If you’re going to bake with a sourdough starter that’s been sitting in the fridge for a few days, I would recommend taking it out of the fridge the day before you plan to bake, feeding it with a 1:1:1 ratio, and letting it sit at room temperature overnight. This step isn’t necessary, but allowing the starter to get back to room temperature will help increase its activity and give your sourdough products more rise.
Feeding Ratios
A feeding ratio is basically the amount of flour and water you feed your “hungry starter”. A hungry starter just refers to a sourdough starter that hasn’t been fed in 24 hours (or a week if in the fridge). A 1:1:1 feeding ratio is the standard method. This means you your mixture will be equal parts hungry starter, flour, and water. So if you have 50g of hungry starter, you feed it 50g of flour and 50g of water. This feeding ratio is great for a maintenance feed if you don’t plan on using the starter to bake that day.
Higher feeding ratios like 1:3:3 or 1:4:4 are actually recommended on days when you plan to use the starter in a recipe. This type of feeding creates a strong starter that is more likely to rise in your baked goods. Think of the feeding ratio like feeding an army. If you have an army of 50 soldiers and you feed each soldier one parcel of food, they will be satisfied but not at full strength (this is like a 1:1:1 feeding). Now if you have an army of 20 soldiers and you feed each soldier 4 parcels of food, they will be better fueled to carry out their tasks (this is like a 1:4:4 feeding). In this analogy, the soldiers are the hungry starter and the parcels of food are the flour and water. If you’re planning to bake, try using a 1:3:3 or 1:4:4 feeding ratio to create a stronger starter. I typically do 20g of sourdough starter combined with 60g of flour and 60g of water.
Feeding Times
With a 1:1:1 feeding ratio, your starter will peak within 2-3 hours because the bacteria are eating through the flour pretty quickly. A 1:3:3 feeding ratio calls for a 5-6 hour peaking time because the bacteria have more “food” to eat. Just know that the higher the feeding ratio, the longer it will take for your starker to peak. After a while, you will get pretty familiar with how long it takes your specific sourdough starter to peak.
Sourdough Discard
The “discard” that I’ve mentioned before refers to the portion of sourdough starter that you remove from the jar before feeding it. This step is necessary if you don’t want to have sourdough exploding all over your kitchen. After all, to bake most sourdough goods, you only need 100-150g of active starter, and about 20-30g leftover so that you can continue your feeding cycle. I keep a small portion of sourdough starter since I only bake about 1-2 times per week. This is nice because I don’t have to discard that much when I’m ready to feed it. I usually just put my discard in the trash, but you can also store your discard in the fridge and use it to make sourdough discard recipes. There are tons of amazing sourdough discard recipes online - my favorite are pancakes, cheese crackers, and coffee cake.
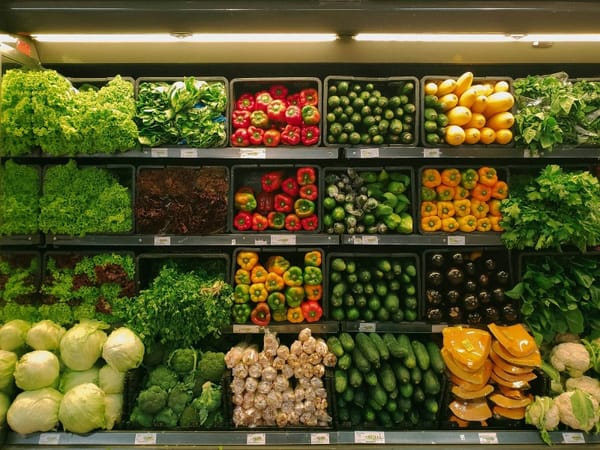
My Sourdough Starter

I keep a relatively small amount of sourdough starter in my jar because I find it’s easier to manage and I don’t have to waste a bunch of discard. The elastic band helps me visualize the rise of the starter, and I keep the weight of the jar written on the lid so I can do some quick math to determine how many grams of sourdough starter I have at any given time.
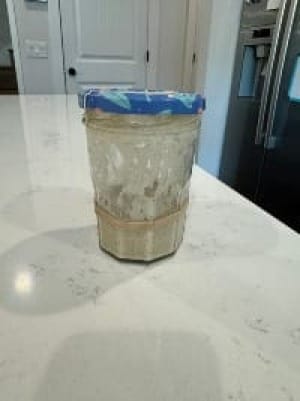
Here is a photo of my sourdough starter 6 hours after a 1:3:3 feeding ratio. I was trying to make two recipes this day, so I doubled my usual feeding amounts and used 40g of hungry starter and 120g of both flour and water. Clearly my jar was too small to handle that amount and it absolutely exploded, but nonetheless it paints a good picture for how much rise you’re looking for in a peaked sourdough starter.
Classic Sourdough Bread Recipe and Schedule
Now that you know the basics of maintaining and feeding a sourdough starter, let’s go over how you can put it to use in a classic sourdough bread recipe!
Supplies
- All Purpose Flour (used in starter)
- Bread Flour (used in dough)
- Salt
- Warm Water
- Food Scale
- Mixing Bowl
- Wooden Spoon or Sturdy Spatula
- Dutch Oven or Other Lidded Pot
- Bread Lame or Sharp Knife
- Damp Towel or Hairnets
- Parchment Paper
Day One
10:00am: Feed Starter
Feed starter with a 1:3:3 or 1:4:4 ratio
I use 20g of hungry starter, 60g of AP flour, and 60g of water
Put a hair tie or elastic around the jar at the level of the starter, so you can visualize the rise
Cover with a loose fitting lid and leave at room temperature for about 6 hours or until the starter has peaked
4:00pm: Make Dough (First Bulk Ferment Begins)
Combine 100g of peaked starter + 400g warm water and whisk
After the starter and water are well mixed, add 500g bread flour
Combine ingredients with a wooden spoon - I switch to using my hands after the dough is mostly combined so I can have more control
The dough will be extremely sticky and shaggy at this point which is normal!
Cover with a damp towel and rest for 30 minutes
4:30pm: Add Salt
Add 10g of salt to the dough and mix it in with your hands
Your dough will be very sticky and wet at this point, but the stretch and folds will help develop that gluten and create a more structured dough
*Wetting your hands slightly will help the dough not stick as much
5:00pm: First Stretch and Fold
Perform the stretch and folds
Cover with damp towel
Rest for 30 minutes
5:30pm: Second Stretch and Fold
Perform the stretch and folds
Cover with damp towel
Rest for 30 minutes
6:00pm Third Stretch and Fold
Perform the stretch and folds
Cover with damp towel
Rest for 30 minutes
6:30pm: Fourth Stretch and Fold
Perform the stretch and folds
Cover with damp towel
Leave to rest on counter for 3-4 hours or until dough has roughly doubled in size
10:00pm: Place in Fridge (Second Bulk Ferment Begins)
Place the bowl of dough in the fridge to continue fermentation overnight
I like to cover my bowl with a hairnet so the dough doesn’t dry out in the fridge, but you can also use a damp towel
Day Two
Your dough can stay in the fridge for up to 48 hours before baking. You can also wake up at 6am to bake your bread if need be. Sourdough baking is very flexible, this is just the schedule I tend to follow.
9:00am: Preheat Oven + Pre-shape the Dough
Preheat Oven to 500ºF with dutch oven inside
Remove dough from the fridge
If the dough properly fermented, you will notice bubbles forming on the surface, it will jiggle when you shake the bowl, and it won't be as sticky to the touch
Lightly flour your working surface and remove dough from the bowl
Pre-Shape the dough
Let rest on counter for 30 minutes
This is a great video for learning how to pre-shape and shape your dough. Instead of using a bench-scraper I just use my hands and it works the same. I also don't own a banneton, so after I shape the dough, I score it and stick it in the dutch oven to be baked.
9:30am: Shape Dough
Shape the dough
Transfer the dough onto parchment paper (I like to use two layers of parchment paper to prevent burning)
9:35am: Score Dough
You can literally score your sourdough however you want. It simply serves as an escape route for the gases that form as the bread bakes. I usually do one slash at an angle to create the classic sourdough bread look. I also just use a sharp knife because I don't have a bread lame. It's fun to experiment with different scoring designs though!
*If you want your designs to show up like the ones in this video, you'll have to coat your dough with rice flour before scoring because it doesn't burn in the oven
Bake Your Bread!!
Remove the pot from the oven and take the lid off
Transfer the shaped and scored dough to the pan by grabbing the sides of the parchment paper
Decrease oven temperature to 450ºF
Place the bread in the oven with the LID ON and bake for 20 minutes
After 20 minutes, take the LID OFF and bake for an additional 30-35 minutes
Once the bread is done baking, remove from the oven and place on a cooling rack
Let it cool for at least an hour before slicing it

Other Recipes
Once you get the hang of maintaining your starter and get familiar with how long it takes for your starter to peak, you can pretty much make anything you want! Here are some of my favorite recipes so far: